Permission Levels & Access
Module-Level Permissions
1.1 Module-Level Permissions
Below that you will see:
Module
Access
Create
Read
Update
Delete
Sale’s Modules include:
- Leads
- Deals
- Quotations
- Contacts
- Calls
- Meetings
- Visits
- Integrations
- Reports
- Settings – Users & Roles
Understanding Permission Columns
2.1 Access

If OFF → Module not visible
If ON → Module visible
2.2 Create
Can create new record
2.3 Read
Can view record
2.4 Update
Can edit record
2.5 Delete
Can delete record
Understanding Permission Levels
3.1 Permission Level Options (Per Module)
In each module, permissions are divided into:
Action — Options Available
Create — Yes / No
Read — All / Own / No
Update — All / Own / No
Delete — All / Own / No
This gives very powerful control.
What “All / Own / No” Means
4.1 ALL
Users can access all records in that module.
He can see:
- All leads
- All deals
- All branches data (if branch access given)
4.2 OWN
User can access only:
- Records created by them
OR
- Records assigned to them
He can see:
- Only his assigned leads
- Only his deals
- Not other sales team data
This is ideal for:
- Field sales team
- Junior executives
- Telecallers
4.3 NO
User cannot:
- View
- Edit
- Access that section or that activity
Module will either:
Role Details
Role Basics
1.1 What Is a Role?
A Role is a predefined set of permissions assigned to users.
Example roles:
- Admin
- Branch Manager
- Sales Head
- User
- Intern
Each role defines access level across modules.
View Existing Roles

2.1 View Existing Roles
Go to:
Settings → Users → Roles
You will see:
Role Name — Total Users — Action
Example entries:
Admin — 2 — (Edit / Delete)
Branch Manager — 1 — (Edit / Delete)
User — 19 — etc
This shows:
- How many users are assigned to each role
- Option to edit or delete role
Create New Role
3.1 Create New Role
Navigation Path:
Sales Module → Settings → User → Roles → Click on + Create New Role

Click:
3.1.1 Step 1: Enter Role Name
Example:
- Junior Sales
- Inventory Executive
- Accounts Assistant
- Factory Operator
3.1.2 Step 2: Global Permissions
You can enable:
- Export Permission
- Mass Update Permission
- User Permission
- Mass Delete Permission
- Assignment Permission
These apply system-wide.
Introduction
Navigation Path:
Sales Module → Settings → User → Roles → Click on + Create New Role

1.1 Roles & Permissions Guide
Roles allow you to control:
- Who can see what
- Who can create data
- Who can edit data
- Who can delete data
- Who can assign tasks
- Who can access reports
This helps prevent:
- Data leakage
- Unauthorized edits
- Operational confusion
Textile Example & Mistakes
Textile Business Example
1.1 Example Scenario
You have:
- HQ (Main Office)
- Adajan (Branch)
- Parvat Patiya (Branch)
You create:
- Admin → Full Access
- Branch Manager → Only Adajan
- Sales Person → Only Parvat Patiya
- Intern → Limited Access
Now:
- Each person sees only relevant data
- Owner sees all reports
- No data leakage across branches
Common Mistakes to Avoid
- Giving Admin access to everyone
- Forgetting to assign branch
- Deleting user instead of deactivating
- Not defining role properly
Final Checklist
- Invite sent
- Role assigned
- Branch access selected
- User accepted invite
- Status Active
Now your team is ready to work inside Wortal.
Understanding User Roles
Understanding User Roles
1.1 Understanding User Roles

When assigning role, you can select:
- Admin
- Branch Manager
- User
- Intern
- And able to create a custom role as well
Each role has predefined permissions (based on your RBAC(Role-Based Access Control)).
Assign Branch Access
2.1 Assign Branch Access
While editing user access, you can:
- Select single branch
- Select multiple branches
- Select All branches
Example:
Branch-wise access ensures:
- Sales person sees only their branch data
- Branch manager sees their branch operations
- Admin sees all branches
Edit User Access

3.1 Edit User Access
Go to:
Settings → Users → Click Edit Icon
Popup shows:
- Email
- Branch selection
- Role
- Status Toggle
You can:
- Change role
- Add / Remove branch access
- Activate / Deactivate user
Click Save.
Activate / Deactivate User
4.1 Activate / Deactivate User
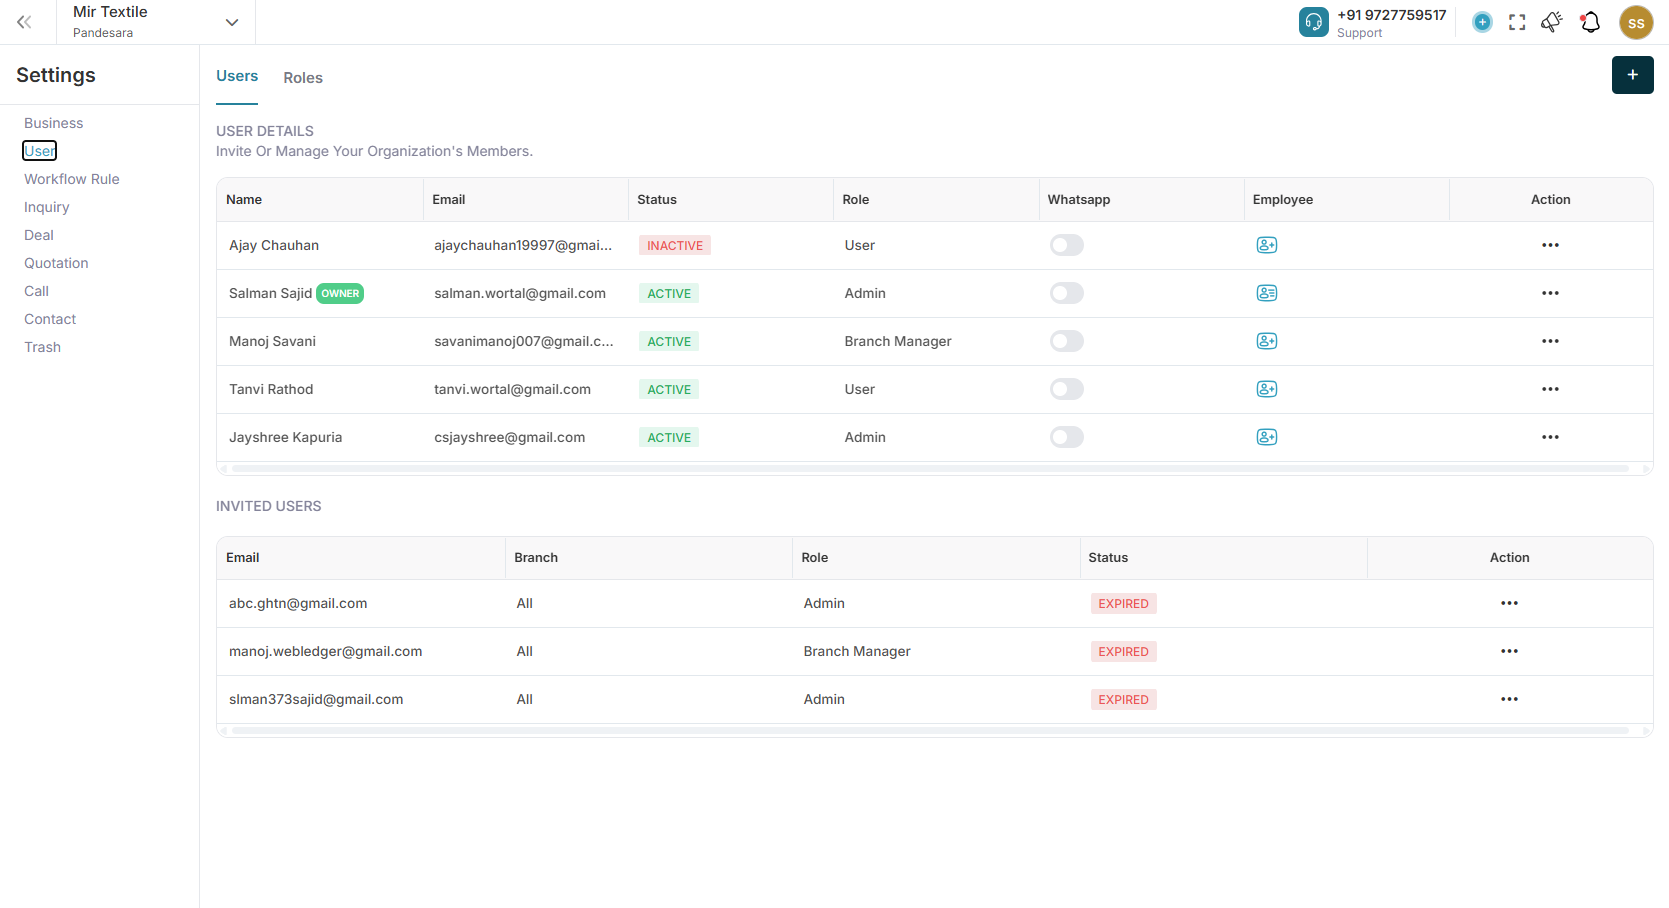
Inside Users list, status shows:
- ACTIVE (Green)
- INACTIVE (Red)
If you turn status off:
- User cannot login
- Data remains safe
- Access is blocked
Useful when:
- Employee leaves
- Temporary suspension
- Role change
WhatsApp Access Toggle

5.1 WhatsApp Access Toggle

In Users table you will see:
WhatsApp toggle
This controls:
- WhatsApp integration access
- Chat / sharing features
Delete User
6.1 Delete User
Click the Delete icon.
6.2 Important
- Deleting user removes login access
- Past activity remains in reports
- Recommended to Deactivate instead of Delete
Create / Invite New User
How to Create / Invite New User

Navigation Path:
Any Module Where You Want To Invite → Settings → User → Users → Click on + Button
The system includes a user invitation flow that allows a business owner or admin to add users to their business by sending an invitation to their email address along with an assigned role. After the invitation is sent, the system checks whether the email is already registered on the platform. If the user is already registered, they can log in and directly access the business with permissions based on their assigned role. If the user is not registered, they must first create an account using the invitation link sent to their email. Once the registration is completed, the system links the account to the invitation and grants the user access to the business according to the assigned role.
2.1.1 Step 1: Go to
Settings → Users
You will see:
- Users tab
- Roles tab
- Invite New User button
Click + Invite New User.
2.1.2 Step 2: Invite User
A popup will open.
2.1.3 Fill Required Details
Field — Description
Send To — Enter user’s email
Select Branch — Choose one or multiple branches
Select Role — Assign role
Click:
- Send Invite
or
- Save as Draft
What Happens After Sending an Invitation?

- User receives email invitation
- Status shows as Pending (in Invited Users section)
- Once accepted → user becomes Active
Introduction
User Management Guidance Under – Wortal
User management allows you to:
- Add team members
- Assign roles
- Give branch-wise access
- Control permissions
- Activate / Deactivate users
BUSINESS SETTING MODULE
You will see this screen when you create a new business
Business Creation Guide

Why Business Setup Is Important?
Before using Wortal, you need to create your business profile.
This allows you to:
- Store your company details
- Add branches
- Add warehouses
- Add bank accounts
- Enable billing & GST
- Manage multi-branch textile operations
Business Profile Setup
2.1 Step 1: Go to Business Profile
Navigation Path:
Sales Module → Settings → Business Profile
You will see three tabs:
- Business Profile
- Branch
- Bank Details
2.2 Step 2: Fill Business Profile Details
2.2.1 Upload Business Logo
Click on logo area
Upload your company logo
This logo will appear on invoices and Quotations.
2.2.2 Enter Business Information
Field — What to Enter
Business Name — Your registered company name
Industry — Select Textile / IT / Other
Currency — Default INR (change if needed)
Contact Number — Main business phone number
Email — Official company email
Website — Your website (if available)
PAN Number — Company PAN
After filling details, click Save.
Branch Setup

3.1 Step 3: Add Branch Details
If you have:
- Multiple offices
- Different godowns
- Different cities operations
You should create branches.
Go to:
Branch Tab → Click “+ Branch”
HQ will be a default system generated Branch, editable.
3.2 Fill Branch Details
3.2.1 Basic Information
- Branch Name
- Email
- Contact Number
- GSTIN (if applicable)
Fill all the details in HQ, as it will be reflecting in Quotations and Invoices.
3.2.2 Address Details
You must enter:
- Country
- State
- City
- Address Line 1
- Address Line 2 (optional)
- Landmark (optional)
- Pincode
Click Add New.
Warehouse Setup (Inside Branch)
Navigation Path:
Sales Module → Settings → Business → Branch

4.1 Add Warehouse Inside Branch
After branch is created, you can:
- Add multiple warehouses
- Set one as Primary
- Activate / Deactivate warehouse
This is useful for:
- Textile stock Separation
- Separate godowns
- Multi-location inventory tracking
Primary Warehouse will be a default system generated warehouse, editable.
Bank Details Setup
Navigation Path:
Sales Module → Settings → Business → Branch Details

5.1 Add Bank Details
Go to:
Bank Details Tab → Add New Bank
5.2 Fill Bank Details
Fields — Required
IFSC Code — ✅
Account Number — ✅
Account Holder Name — ✅
Account Type — ✅
Bank Name — ✅
Branch Name — ✅
UPI ID — Optional
You can:
- Multiple Banks can be added
- Different Banks can be added for different Branches
- Set one bank as Default Bank, to be used in quotation and invoices
- Edit or Delete later
This bank will be used in:
- Invoice printing
- Quotation documents
Final Checklist Before Starting Operations
6.1 Checklist
- Business Profile saved
- At least 1 Branch created
- At least 1 Warehouse added
- Default Bank added
Once done, you can:
- Add products/designs
- Start adding leads
- Create orders
- Generate invoices
Important Tips for Textile Businesses
- If you operate in multiple cities → Create separate branches
- If you only have one office but multiple godowns → Create multiple warehouses
- If you deal in GST billing → Ensure GSTIN is correctly added
Common Mistakes to Avoid
- Not setting Primary Warehouse
- Entering wrong GSTIN
- Skipping bank details (invoice will show blank)
- Using personal phone number instead of official number
How This Helps You
After proper business setup:
- Owner gets branch-wise reports
- Stock reports branch specific
- Orders are mapped correctly
- No confusion in billing
- Team access is controlled branch-wise
Architectural Strength
This structure supports:
- B2B textile account structure
- Multi-person decision flow
- Multi-branch delivery
- GST compliance
- Scalable address system
- Clean master data separation
Create Organization & Basic Details
Create Organization
Navigation Path:
Sales Module → Contact→ Organization → Click on + Organization

1.1 Purpose of This Screen
This screen is used to create a company-level contact in the Wortal.
An Organization can represent:
- Textile trader
- Wholesaler
- Distributor
- Manufacturer
- Export house
- Retail chain
This becomes the master entity used in:
- Billing
- Deals
- Order management
Basic Information Section
2.1 Organization Name * (Mandatory)
Official business name.
Primary display name across the CRM.
2.2 Phone No.
Country code selector (default: +91).
Multiple numbers supported via plus icon.
Used for:
- Sales calls
- WhatsApp communication
- Duplicate detection
2.3 Email ID
Multiple emails supported via plus icon.
Used for:
- Invoice sharing
- Communication
- Marketing
2.4 PAN No.
Company PAN (if applicable).
Important for:
2.5 Credit Period (Days)
Defines payment cycle.
Examples:
Used in:
- Deal closure
- Orders
- Payment reminders
2.6 Website
2.7 Special Date (Checkbox) → Date of Incorporation
Used for:
- Relationship engagement
- Automated anniversary reminders
Person Details (Collapsible Section)
3.1 Purpose
Used to link individuals under the organization. One company can have multiple decision makers.
3.2 Fields
Person Name
Select an existing person or create a new person.
Designation
Examples:
- Owner
- Purchase manager
- Accountant
- Sales head
Purpose:
Helps identify decision authority.
Contact Number
Personal contact number of the individual (separate from organization number).
Email
Personal email of the contact person.
PAN No.
Individual PAN if needed.
+ New Person
Create a new person inline without leaving the form.
Billing Details
Used for invoice generation.
4.1 Country → State → City (Dropdown Hierarchy)
Ensures structured address entry.
4.2 Address 1 / Address 2
Primary billing address fields.
4.3 Landmark
Optional clarity for location.
4.4 Pincode
Used for:
- Delivery validation
- Tax compliance
4.5 GST Type
Options:
- Registered
- Unregistered
- Composition
4.6 GSTIN
Required if GST Type = Registered.
4.7 + New Billing Details
Supports multiple billing addresses.
Important for large buyers with multiple branches.
Shipping Details
Used when delivery location differs from billing.
5.1 Same as Billing (Checkbox)
Auto-copies billing address into shipping.
5.2 Shipping Address Fields
Same structure as billing.
5.3 Receiver Section (Important in Textile Flow)
Includes:
- Receiver name
- Company name
- Receiver mobile number
- Email
Used when:
- Delivery goes to warehouse
- Delivery is handled by staff
- Dispatch requires receiver verification
5.4 + New Shipping Details
Supports multiple warehouses and branch delivery locations.
Other Details
6.1 Remark
Short internal comment.
Example:
“High volume buyer.”
6.2 Description
Detailed internal note.
Example:
“Deals in digital prints, prefers fast dispatch, negotiates heavily.”
Attachment
Upload documents such as:
- GST certificate
- PAN copy
- Agreement
- Trade license
- Visiting card
Supported file types (example set):
- png, jpg, jpeg, gif
- doc, docx
- xls, xlsx
- ppt, pptx
- txt, csv
- pdf
Max size:
1MB (as per your specification)